Managing Faxes with FaxTalk FaxCenter Pro 10
This topic is intended for Independent pharmacies only and is not applicable to Rexall pharmacies.
The topics in this section were sourced from FaxTalk FaxCenter Pro 10 User Guide1 Thought Communications. (2020). FaxTalk FaxCenter Pro. https://www.faxtalk.com/faxtalk-support-downloads/. For detailed information on using FaxTalk FaxCenter Pro 10, refer to the User Guide.
This topic is only applicable if you are using FaxTalk 10 to send or receive faxes. If you are using Cloud Fax, refer to Managing Faxes with Cloud Fax.
Select the dropdowns to learn more about managing faxes with FaxTalk FaxCenter Pro 10.
The FaxTalk Fax Viewer allows you to view, print, rearrange, and edit the current fax image. From here, new fax documents can be created or documents can be added to existing faxes through scanning.
There are two ways to open the FaxTalk Fax Viewer.
To open the FaxTalk Fax Viewer from FaxTalk FaxCenter Pro:
-
Open FaxTalk FaxCenter Pro.
-
Under Tools, select Fax Viewer.

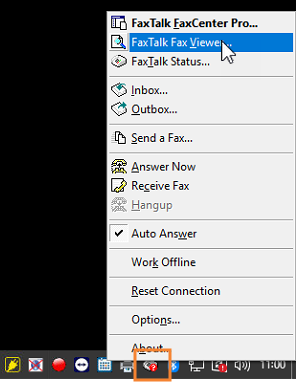
To open the FaxTalk Fax Viewer from the Windows system tray:
-
Right-click the FaxTalk CallControl icon in the Windows system tray.
-
From the menu, select FaxTalk Fax Viewer.
You can configure FaxTalk 10 to display a notification message and play a sound when a new fax is received.
To set up a notification prompt for a fax:
-
Open FaxTalk FaxCenter Pro.
-
Under the Tools menu, select Options.
-
On the left, select New Item Events.
-
Select the Play sound checkbox.
-
Choose a sound file from the list or select the ... button to browse your hard drive for a saved .WAV file.
-
In the Play sound every field, specify the interval for playing the sound.
-
-
Select the Display a new item notification message checkbox.

-
Select Apply.
-
Select OK.
A contact's information can be saved in FaxTalk so you can quickly select them when sending a fax. You can also organize contacts into Phonebooks for easier retrieval.
To add a new contact:
-
Open FaxTalk FaxCenter Pro.
-
Open the Contacts folder.
-
If you wish to add the contact to a specific Phonebook, select the Phonebook from the Folder List. To view all Phonebooks, select the plus button beside Contacts in the Folder List.
If you accidentally added the contact to the wrong Phonebook, you can easily move them by right-clicking on the contact and selecting Move to Phonebook.
-
From the File menu, select New > Contact. The New Contact window opens.
-
Enter the information for the contact.
-
Select OK.
To add a new Phonebook:
-
Open FaxTalk FaxCenter Pro.
-
Open the Contacts folder.
-
From the File menu, select New > Phonebook. The Create New Phonebook window opens.
-
Enter a name for the Phonebook.
-
Select OK. The Phonebook will now appear under the Contacts folder in the Folder List.
Instead of automatically printing every fax that is sent to your pharmacy, FaxTalk can store these faxes for your review.
To view a received fax:
-
Open FaxTalk FaxCenter Pro.
-
Open the Inbox.
-
Select the received fax from the List View.
-
Do one of the following:
-
From the File menu, select View.
-
Double-click the received fax in the List View.
-
From the Inbox, you can print one or more faxes without viewing them.
To print a received fax:
-
Open FaxTalk FaxCenter Pro.
-
Open the Inbox.
-
Select the received fax from the List View.
-
From the File menu, select Print. The Print window opens.
-
Select the desired options, including the appropriate printer. Additional options can be chosen by selecting Properties.
-
Select Print.
FaxTalk 10 allows you to save a fax document on your computer, which you can then upload into Propel Rx.
To save a received fax:
-
Open FaxTalk FaxCenter Pro.
-
Open the Inbox.
-
Select the received fax from the List View.
-
From the File menu, select Save As. The Save As window opens.
-
In the Save in box, select the location to save the file.
-
In the File name field, enter a name for the fax.
-
Select Save.
Related Topics
If you have a scanner set up on the computer that has FaxTalk 10 installed, you can send scanned documents as faxes.
To send a scanned document as a fax:
-
Open FaxTalk FaxCenter Pro.
-
From the File menu, select New > Send a Fax. The Send a Fax window opens.
-
Under the Options menu, select Scan. The scanned document will be added as an attachment to the fax.
-
Enter the recipient's information in the Send a Fax window.
If sending to multiple recipients, enter the first recipient's information in the Name, Company, and To fields. Once done, select Recipient > Add Recipient to List. The recipient will be added to the list and you can proceed with entering the next recipient's information.
If the contact(s) is saved, you can highlight them on the right-side and then select the left arrow button to add them as a recipient(s).
-
Optional - Select the checkbox to include a coversheet. Enter any necessary information in the Subject and/or Memo fields. These will print on the coversheet.
-
Optional - From the File menu, select Preview to preview the fax document.
-
From the File menu, select Send.
In some situations, you may need to resend a fax such as if the fax was lost or the wrong recipient was chosen at the time of sending.
To resend a fax from the Sent Items:
-
Open FaxTalk FaxCenter Pro.
-
Open the Sent Items folder.
-
Select the previously sent fax.
-
Under the File menu, select Resend. The Send a Fax window opens.
-
In the Name field, enter the name of the recipient for the fax.
-
In the To field, enter the fax number of the recipient.
-
If you do not want to include a coversheet, deselect the Include a coversheet with this fax checkbox.
-
Select Send.
If a fax fails, it will show a Failed status in the Outbox. It is possible to resend a fax directly from FaxTalk 10.
To resend a failed fax:
-
Open FaxTalk FaxCenter Pro.
-
Open the Outbox folder.
-
Select the fax.
-
Under the File menu, select Send Now.
-
Confirm the fax has a status of Sent in the Transaction Log.
To resend a failed fax to a different fax number:
-
Open FaxTalk FaxCenter Pro.
-
Open the Outbox folder.
-
Select the fax.
-
Under the Edit menu, select Properties. The Send Properties window opens.
-
In the To field, enter the new fax number.
-
Select Send.
-
Confirm the fax has a status of Sent in the Transaction log.
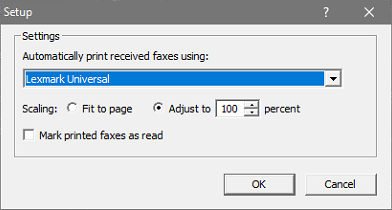
FaxTalk 10 can automatically print received faxes to a selected printer.
To set up automatic printing of received faxes:
-
Open FaxTalk FaxCenter Pro.
-
Under the Tools menu, select Options.
-
On the left, select New Item Events.
-
Select the Automatically print received faxes checkbox.

-
Select Setup to select the printer all received faxes should print to.
-
Select the default printer for received faxes.
-
Select Apply.
-
Select OK.
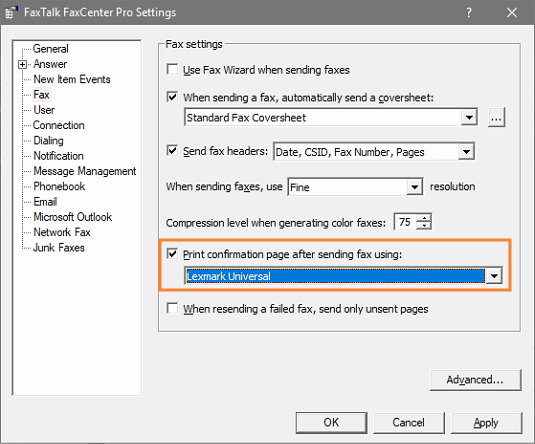
FaxTalk 10 can automatically print a confirmation page containing an image of the first page of the fax and transaction details once a fax is successfully sent. If you do not want to set up automatic printing, you can still print confirmation pages manually. For more information, see Printing a Confirmation of a Sent Fax.
To set up automatic printing of sent fax confirmations:
-
Open FaxTalk FaxCenter Pro.
-
Under the Tools menu, select Options.
-
On the left, select Fax.
-
Select the Print confirmation page after sending fax using: checkbox.
-
Select the default printer for sent fax confirmations.
-
Select Apply.
-
Select OK.
A confirmation page containing an image of the first page of a sent fax and transaction details can be printed when needed.
To print a sent fax confirmation:
-
Open FaxTalk FaxCenter Pro.
-
Open the Sent Items folder.
-
Select the sent fax transaction you want to print a confirmation page for.
-
Under the File menu, select Print Confirmation.
-
Select the desired options, including the appropriate printer. Additional options can be chosen by selecting Properties.
-
Select Print.
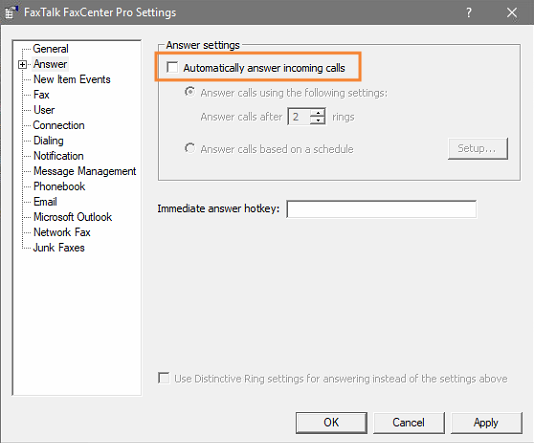
If your pharmacy does not want to receive faxes in the FaxTalk Inbox or printer, you can turn off this feature. All faxes will then be sent to print on your fax machine.
To disable the Inbox feature:
-
Open FaxTalk FaxCenter Pro.
-
Under Tools, select Options.
-
On the left, select Answer.
-
Deselect the Automatically answer incoming call checkbox.
-
Select Apply.
-
Select OK.